Tuesday, June 9, 2015

Thank You!!!!

Your Final Exam will be:
Block 2: Thursday Jan. 11th 2015
10:13-12:10

Thank you for your participation in digital photography. I hope that you continue to use digital photography as a medium. I wish you seniors, the best of luck in your endeavors and have a wonderful Spring semester. For you underclassmen, I hope to see you continue in art, as an artist cannot fail- it is a success to be one!
Good Luck on Final Exams!

Reminder:
Delete your blog if you desire

Clean out folders: Delete all folders & files

Study for final (take practice quiz over and over!)

Monday, June 8, 2015

Classroom Clean Up

(1) As we near the end of the semester you need to clean out your folders and files. If you would like to keep any of your images you'll need to either (A) Email it to yourself or (B) Store via Google Drive. When you have backed up whatever you need DELETE ALL FOLDERS & FILES, except for your final portfolio film, if you have not presented it to the class yet. Check your desktop, your downloads folder, and any misc. folder you may have stuck something.

(2) You may also, should you choose, DELETE YOUR BLOG.
If you delete your blog, it will no longer be available online and will be permanently removed from your list of blogs on your Blogger Dashboard.
Here's how to delete your blog:
  1. Sign in to blogger.com and access your Blogger Dashboard.
  2. Beside the blog you want to delete, click the drop-down menu to the right of the gray Post List iconBlogger post list icon & drop-down.
  3. Select Settings.
  4. Click Other (under Settings) on the left side of the page.
  5. At the top of the page under "Blog tools" click Delete blog.
  6. Click Delete this blog.


The title of the deleted blog will appear in the "Deleted blogs" section for a short time after you delete your blog. During this time period, you can click Deleted blogs on the left side of your Blogger Dashboard to see the titles of your recently deleted blogs.
Deleted blogs in dashboard

Thursday, June 4, 2015

Final Exam Review III

Please click on the link below, you will be directed to another practice digital photography exam- Press START when ready! The questions from these exams will be part of your final so pay attention!


IMPORTANT! Leave your score page OPEN and show me your scores before closing! Otherwise, you will have to repeat a different quiz for credit! DO NOT PRINT! Just show me the screen.

Final Exam Review II

Please click on the link below, you will be directed to another practice digital photography exam- Press START when ready! The questions from these exams will be part of your final so pay attention!


IMPORTANT! Leave your score page OPEN and show me your scores before closing! Otherwise, you will have to repeat a different quiz for credit! DO NOT PRINT! Just show me the screen.

Tuesday, June 2, 2015

Final Exam Review I

Please click on the link below, you will be directed to a practice digital photography exam- Press START when ready! TAKE NOTES! You will see these questions again on your final exam on June 11th.


IMPORTANT! Leave your score page OPEN and show me your scores before closing! DO NOT PRINT. Otherwise, you will have to repeat a different quiz for credit!

*If some pictures on review do not load, skip them, I am more concerned about you getting the information then your scores...

Don't forget! Post video for complete credit!

Post videos

There are several ways to post a video to your blog. .
  1. Click the black and white clapboard icon on the Post Editor toolbar.


  2. In the popup window, you'll see four options:
    • Upload: You can browse for a upload a video from your computer. If this is your first video upload, you must agree to the Terms and Conditions.
    • From YouTube: You can search YouTube and select a video to display on your blog.
    • My YouTube videos:If you have your own videos under you Google Account, you can easily access and upload them through this tab.
    • From your phone: If you have Google+ and Android, you can download an application that will allow all the videos from your phone to upload instantly to your Google Account. You can then click From your phone and select a video from your phone to publish on your blog. All content instantly uploaded from your phone is private until you choose to share it.
  3. Select one of the options, and click upload.

Thursday, May 28, 2015

Final Portfolio Review- Digital Photography

Final Portfolio Review- Digital Photography
1. Movie in Windows moviemaker

2. Mini Resume
3. All images from length of class
4. A photographer's work that has influenced/inspired you
5. At least one “whatever” photo

Create a movie presentation with all slides of your work. 
Requirements can be found in your ASSIGNMENTS folder, along with PowerPoint outlining everything you need to know. View this as often as you need. 
Things you may find helpful to include:
Examples of how you improved…
Before/After’s of your “edited” or manipulated work
Music: 
• All Images are to be animated
• Interior pages may run at a speed where you can say a word or two about the piece AND we have time to see it before it flashes by during the oral presentation the student isn’t rushed
• All text should be animated and staggered
• Staggering text will minimize audience reading ahead and not paying attention to ad lib’ed information


**** Portfolios are due on 6/2. You will have 4-5 minutes to present your movie to the class. You must narrate through the presentation as if we have never heard of you or seen your work. Presentations are your last Major Assessment for the course ****

Grading: 

• Students may have notes but are not allowed to read from their presentation on the big screen
• Students are to speak audible
• Students are not to rush through presentation
• Students must be prepared to answer questions from the audience
• Students must include everything asked on them outline in ASSIGNMENTS folder and in class MAJOR ASSIGNMENTS folder. SAVE AS LAST_FIRST_FINAL

FINALLY, your last post ever!! POST YOUR VIDEO TO YOUR BLOG AS SEEN IN THE EXAMPLES HERE
Nicole Anjali  Tina Anum

Post videos

There are several ways to post a video to your blog. .
  1. Click the black and white clapboard icon on the Post Editor toolbar.


  2. In the popup window, you'll see four options:
    • Upload: You can browse for a upload a video from your computer. If this is your first video upload, you must agree to the Terms and Conditions.
    • From YouTube: You can search YouTube and select a video to display on your blog.
    • My YouTube videos:If you have your own videos under you Google Account, you can easily access and upload them through this tab.
    • From your phone: If you have Google+ and Android, you can download an application that will allow all the videos from your phone to upload instantly to your Google Account. You can then click From your phone and select a video from your phone to publish on your blog. All content instantly uploaded from your phone is private until you choose to share it.
  3. Select one of the options, and click upload.


Tuesday, May 12, 2015

Assignment: Diptych with Interaction

Luiz Maurina, Dyptich "The Fighter" 2011
Thumbnail Drawings of your IDEA & model in mind DUE:  Wednesday 5.13.15
IMAGES DUE: Thursday May 21st 2015
Image from Richard Vantielicke Series

1. Read the artist statement & View the work of artist Richard Vantielcke below in your Major Assignments folder, or click on link - interactive images by Richard Vantielicke
Image from Richard Vantielicke Series
Start formulating an idea, and choose your model or models. It does not have to be someone from our class. However, you may not pull people out of class, you can photograph them on your own time. You will have Friday 5.15.11- Wednesday 5.20.15 to shoot this assignment in class. If you are absent and miss your day, you will still be responsible for the shoot, but not have the benefit of studio lighting. You will have to set up your own makeshift studio at home, with a sheet and a window for light. The specific days will be assigned, see below for shooting day schedule.
A final diptych series (4 shots total, 2 pairs) in which one half of the diptych “interacts” with the other either by theme, movement, message or concept.DUE: Thursday day May 21st 2015 Save as Last_First_Dyptich1, Dyptich2, etc. in MAJOR folder.
Dave Kimelberg is a Boston-based photographer, lawyer and general creative-type photographing tatooed professionals proving, at the very least, you should not judge a book by it's cover.
Shubani Singh, Dyptich 2011

Elisa Sapolinick, Dyptich 2011

SHOOTING SCHEDULE:
Friday May 15th
Boateng, Tyler
Borges, Juanita
Cammack, Joshua
De Jesus, Matthew
Elsawy, Aya
Francis, Joseph
Gurrieri, Nicolas
Harrell, Mariah
Monday May 18th
Hrasna, Amanda
Iqbal, Shahista
Jones, Rosalyn
Joyce, Jeffrey
Kinney, Bryce
Lippe, Julianna
Murray, Marissa
Pastore, Samantha
Tuesday May 19th
Patel, Hiral
Patel, Khushbu
Patterson, Brendan
Richardson, Jazmine
Rodriguez, Angelo
Rodriguez, Eliry
Sachdeva, Shivil
Solanki, Monica
Wednesday May 20th
*make up photos for anyone who missed their day

Monday, May 11, 2015

Assignment: What is a Watermark?


Your Assignment: Create a Watermark, save it on a transparent layer so you can use it again, as well as pasting it to one of your photos. POST your watermarked photo on your blog.  Here is Example 1 of how I use watermarks as well as a second Example 2.


Question: What is a watermark? How can I add a watermark to my photos?
Adding a visible watermark is a common way of identifying images and protecting them from unauthorized use online. Today, you're going to create an effective watermark and apply it to your digital photos or art work.
Answer: A watermark is a visible embedded overlay on a digital photo consisting of text, a logo, or a copyright notice. The purpose of a watermark is to identify the work and discourage its unauthorized use. Though a visible watermark can't prevent unauthorized use, it makes it more difficult for those who may want to claim someone else's photo or art work as their own.


Tips for Effective Watermarking

If you are going to use a watermark, care should be taken to ensure that the watermark is effective, not only for proving that an image was modified, but also for educating the would-be pirates about copyright and ownership. Ideally, the watermark should be a copyright symbol along with the name of the owner, and the URL of the owner's web site, if applicable. This not only conveys the message of copyright, but it gives others an opportunity to contact the original owner of the image. Watermark placement can be a bit of a balancing act. The watermark should be placed carefully so as not to detract from the image too much, but you also don't want to place the watermark in a area of solid color or a textured area where removal would be easy to conceal. The example on this page was designed to show an extreme example of watermarking and would be is far too distracting for a portfolio photograph. In practice, the watermark should make up a smaller percentage of the overall image area compared to this example.

How to Watermark Your Photos

So now that we've discussed what a watermark is and how to make them effective, you may be wondering how to put a watermark in your images. There are many methods for watermarking photos. We'll use Photoshop for today's purposes. Please open the program and open the tutorial in your Photoshop folder, watch the video in this post OR find an online tutorial that is easier for you to follow.
POST YOUR COMPLETED WATERMARKED PHOTOGRAPH TO YOUR BLOG FOR CREDIT FOR TODAY'S CLASSWORK.

Friday, May 8, 2015

Photowalk: 5.8.2015


Photowalk Friday is here! 

You have the option of EITHER assignment below.

Option 1:
Photograph a COLLECTION of things


 Option 2:
Choose a COLOR and only photograph items in that color

Monday, May 4, 2015

Color Grid Photo Display Effect With Photoshop

Color Grid Photo Display Effect With Photoshop
Complete this photo effects tutorial, find it in your Tutorials Folder (#7)


Friday, May 1, 2015

Don't forget!


Assignment: creating a business card

 As a student (or photographer!) you share many of the same attributes of someone in the business world. You may meet people in the course of a day whom you do not know and who do not know you.It is not always possible to spend a great deal of time talking with and getting to know the people you meet. Even when you do have time to talk, people are not always going to remember everything they learned about you.
People you see everyday — teachers, other students, parents, and family members — may not know things about you that you'd like them to know. When business people meet they exchange business cards. These small pieces of paper usually contain a person's name, the name of their business, and a title or description of the work they do, and a way to contact the person, such as a phone number or address.

Task:

Create a business card for yourself. Your card should help others know and remember you. Ideally it should convey a sense of who you are, what you do, or your interests — cheerleader, history buff, teacher's assistant, class president, hall monitor, avid reader, or a photographer!
A business card generally focuses on a single facet of an individual or business. You may be a cheerleader who also raises rabbits and tutors younger students afterschool. Create a business card for just one of those aspects of your school life or extracurricular activities, or the life you WANT to lead when you are out of school.


Checklist:

Many of the items in this list are optional. You must decide which ones are appropriate for your business card.
  • Name of Individual.
  • Name of Business or Organization.
  • Address.
  • Phone Number.
  • Fax Number.
  • Email Address.
  • Web Page or Social Media Address (Twitter, Facebook, etc.).
  • Job Title of Individual.
  • Tagline or description of Business or Organization.
  • Logo.
  • Graphic Image(s) (including purely decorative elements).
  • List of services or products.
The items listed below are to aid in designing your business card. Some may not apply.
  • Horizontal or Vertical Layout.
  • Emphasis on Business or Organization (name and/or logo).
  • Emphasis on Individual.
  • Emphasis on Title of Individual.
  • Emphasis on a particular part of the contact information (phone, address, email, etc.)
  • Size of Logo or other graphics — large (dominant) or small, etc.
  • Number of Colors.
  • White space (blank spaces) toward the middle or toward the outer edges.
  • Conservative typeface (such as those used in the stories in your textbooks) or Fun, Informal typeface (such as crooked letters, funny shapes, odd sizes, or type that looks like handwriting) or a mix.
  • SEE ALSO 11 Parts of A Business Card


Steps:

  1. First, decide what you want your business card to tell others. Do you want to focus on your activities with the Art Club or do you want to announce that you are class leader or that you are a skateboard enthusiast? It may help to list everything about yourself then pick one topic.
  2. Describe yourself. After deciding on what aspect of your school life or activities that you want to focus, make a list or write a description that tells about that part of your life.
  3. Decide if you want a "serious" or formal card or something more light-hearted or informal.
  4. Using the Business Card Checklist, list the major components of your business card. Mark out any components you wish to omit from your card. If appropriate, come up with a title for yourself. To put everything you want on this small card you may need to come up with different ways to say the same thing. Look for shorter words in place of long ones. Use a single word in place of two or three different ones. Experiment with abbreviations.
  5. Look at sample business cards. Identify those that have a style you might like to imitate or borrow, but DO NOT PLAGARIZE!
  6. Sketch out some rough ideas of how you want your business card to look — including any graphics you think you want to include.
  7. Using Photoshop, create a new Jpeg file, sized according to the specs below, 300 resolution, and 'transfer' your rough sketches to the computer. 
  8. POST final buisness card design (front AND back if you have a back) on to blog


Evaluation:

When POSTing your card, attach the following questions to the post with your answers.
  1. What is the focal point of this business card? (What part is supposed to catch the reader's eye first?) 
  2. What job, role, or activity does this business card describe? 
  3. Is this supposed to be a formal (serious) or informal (casual) business card?
 DUE TUESDAY 5/4, POST front (and back if necessary) TO YOUR BLOG 

Thursday, April 30, 2015

Project Grad T-shirt Design

As I will not be in class today, please read the following and begin working on your own. You may continue to work on this in the following days and can even do this via drawing on paper if you'd prefer. All of you however, must submit at least ONE t-shirt idea by next Monday (May 4th). You will have additional assignments tomorrow and Monday, I return Tuesday. 

T-Shirt Design Contest!
What: T-Shirt Design for YOUR graduating class to rock at project graduation this June!
Who: You! The senior class members
How: There are a few ways you may do this. You could use one of those lame design websites that offer random clip art and don't give you a lot of control OR you can use Photoshop to create a supercalifragilisticexpialidocious design that gets everyone's attention! *I put t-shirt outline images in your sample images folder for your convienence. 
When: Due By                    Save As last_first_ProjGrad in Minor Assignments folder. Make sure it's at least 300 resolution so printer can enlarge the design without a problem.
Entries will be submitted to Mr. Cilento and he and your class officers will decide on a winning design. That design will then get sent to the printer and on June 18th, your classmates could be sporting your fabulous tee!
The Fine Print: T-shirt designs must be in school colors (green, white, black & gray) and the base tee-shirt must be white (it is too expensive to print on black tee's). The design must include"John F Kennedy, Kennedy or JFK",  "project graduation" and "2015" in some respect. Other then that you have a lot of freedom so get to designing!!! A t-shirt template can be found in your Assignments folder.

PLEASE POST YOUR DESIGN TO YOUR BLOG AS WELL SO WE CAN SEE ONE ANOTHER'S DESIGNS
Some tee's from the past....


***If you are a junior, you may design one for next year***

Tuesday, April 28, 2015

Photoshop Tutorial: Gold Foil Text


Follow the tutorial above to create golf foil text! 


Thursday, April 23, 2015

Assignment: Alphabet Photography

For your photography assignment, you will be experimenting with what we'll refer to as "Alphabet Art". Using photography, you'll be responsible for spelling out a word of your choice using black and white images. Please photograph in color and we will learn as a class how to properly convert to grayscale so as to achieve proper contrast.


Below, you'll find an example of alphabet art spelling out a word. Can you see the letters?

"K-E-N-N-E-D-Y"
  1. Choose a word, at least five letters long, and cannot be the same as any other 
  2. student in the class
  3. Start photographing, take more then 1 picture for a given letter as you may find something better later in the week. Look high and wide to find your letters, they can be in the most unique places. Try your best to find natural letter forms and not have to "spell it out" yourself using found objects.
  4. Take COLOR images
  5. Upload images throughout the week. (I will be out Thursday-Monday) so you will have this major assignment going on amongst some minor ones with the substitute. 
  6. SAVE EACH IMAGE separately in a folder titled Letters, in Major assignments, no larger then 8.5x11 
  7. For POST credit, place each image on panoramic canvas much like May  7th titled "Alphabet Art", before you leave class.
  8. Also place a saved version of your flattened, full word in 'letters' folder as a final image.

NO YOU CANNOT WRITE THE LETTER DOWN AND PHOTOGRAPH IT 
I'd also prefer you NOT photograph letters, photograph things that LOOK like letters. 

Wednesday, April 22, 2015

Bored?


Check out Twisted Sifter for some incredible photos! 

delivering an elliott 405 computer in 1957 black and white norwich
Delivering a computer in 1957 Photograph via Norfolk Record Office

vintage selfie 1920 (1)
The 1920's Selfie


Friday, April 17, 2015

Assignment: Photo Book


Assignment: Photo Book via Blurb.com

  • You will be creating a photo book with your own specific them, please create a folder titled "Journal" so that you get credit for shooting the 50 images over the next week. This includes collecting of old images if that is to your purposes. (20 points of final grade: Due Tuesday 4/21)
  • Have your idea ready to share with me


  • When finished uploading, please click on the following link to BLURB and create your user name and password. Click on JOIN TODAY in top right hand corner. Use the email address you created for THIS CLASS.
  • EMAIL ME IMMEDIATELY WITH YOUR USERNAME & PASSWORD. Email message should look like this:
Subject: LastName, Block #
Message: Nicole Vignola  
                          <nicolekvignola@gmail.com>
                           Username: nicolevig
                           Password: cartel1005

  • Explore the book making options. Keep in mind- creativity is key! You can photograph your own writing include special quotes,  you can scan old photographs - be original(60 pts of final grade)
    • you do not have to use every single image you shoot
    • your book SHOULD have a theme, not just "photo book"
    • creativity is key!
    • spelling errors will NOT be tolerated! spell check!
    • Yes, you need a title page.
    • yes, you SHOULD use Photoshop to edit your images, before simply inserting any image into your book. Try layering, color correcting, etc.
    • Your book needs to be at least 20 pages long, not including the title page and does not have to use every photo you took. Select only the best for the book.
FINISHED BOOKS DUE FRIDAY April 24th 2015 
You'll present your book to the class for crit Fri-Mon


Open the document on H: Drive for Blurb.com instructions


 “How do I do that?” you ask..
1. Over the course of the weekend and into next week, document your thoughts and feelings about particular people, places, and events you visit or encounter. Not only must you photograph these people, places or things, but you must keep a written journal about what you experience during this time.  

2. Choose a theme, for example "senior memories" or "people of Iselin" etc. Your theme may not become apparent until after you've shot for a few days, so shoot EVERYTHING, from your sports practice, your vacation, family time, etc. 

3. When you return from Break, we will view your journals and upload your pictures and you will make a digital version of the example above.. (Details about what will be done IN CLASS will follow) The final project will be a digital photography book. 

“So how do I start?” You ask..
Start SHOOTING and WRITING.. as soon as you leave school TODAY.. the more you document, the more material you will have for your digital journal. Do not save this assignment for the weekend before you return to school, your lack of effort will be obvious and your grade will reflect it.

“What are the specifics?” you ask..
You must have AT LEAST 25 photographs. You might not use all the photos in your final compilation, but you will need to have them on Tuesday for full credit. 

THIS IS A MAJOR ASSIGNMENT
Finally, you will need to post a 5 screen shots of your favorite pages on your blog (also by 4/28)
Click link below for an excerpt of this project
http://medinapaula31.blogspot.com/2013/04/photo-journal.html

Thursday, April 16, 2015

Food Photography: A Comparison (Photo Walk)


Egg Muffin Sandwich Ad Photo vs. Actual Product
Welcome to a new series of posts comparing food photography used by the restaurant and food manufactures versus what you are actually served or buy.
Is It Real or Is It Photoshop
The food industry gets away with murder when it comes to their product photographs versus what you actually get or buy. Many consumers are pissed off when the product doesn’t match the higher stylized, heavy retouched photographs restaurants and processed food manufacturers use in their advertising and product packaging.
For most industries this is considered misleading and deceptive advertising. For food industry lobbyists and management it is American enterprise at its best. They  “invest” millions of dollars each year assuring Congress, the FDA and USDA do not pass laws or regulations forcing them to show customers what they are actually buying versus the deceptive food photography used to sell their products.
Italian Med Diet WYSIWYG Photos
If you’ve bought my cookbooks or made any of the recipes on this website, you know my policy is what you see is what you get. What the computer industry calls WYSIWYG (pronounced whizzy wig). When it comes to fast and casual food restaurants and thousands of processed foods sold in supermarkets what you see isn’t what you get. 
It Attracts Buyers and Viewers
Beautified stylized food photos sell cookbooks and magazines and attract viewers to cooking shows and websites. But what is the point if you make a recipe and it doesn’t look anything like the photo or version plated on the cooking show? You think you did something wrong when it actuality you prepared and cooked the recipe exacalty as specified. It just so happened the cooking show has a version impeccably prepared and styled waiting in the wings to make your mouth water and come back for more. Kind of like Pavlov’s dog conditioning.You see this gorgeous, mouth watering food and can’t wait to make or buy it.
You Get What You Pay For
High end restaurants can turn out works of art that stimulate sight, smell and taste. In some cases it is a shame destroying what a chef took many minutes or hours to create. But with the exquisitely plated meal comes an exorbitant price.
Food manufacturers know most consumers won’t return a product that doesn’t look like the photo in the ad, restaurant menu, or package. They’ll moan, groin and curse, but rarely return it for a refund. If most Americans did return these times, manufactures would listen. But, when you’ve only paid a few dollars for an egg sandwich, hamburger, chicken or pizza you shouldn’t expect it to look like food served by high quality restaurants or gourmet shops.You should expect the photographs to look more like the food or the food more like the photograph.
Photo Fact versus Fiction
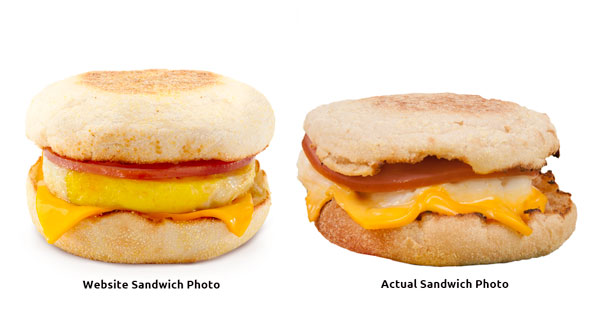
In this new series of posts, I will compare what restaurants and food manufactures want you to believe you are buying versus what you actual get. The use of deceptive, misleading food photography should be banned. If fast food restaurants served sandwiches like the one pictured on the left you should expect to pay $5 or more per sandwich. At that price, most Americans would abandon fast food in droves.
Egg Muffin Sandwich Ad Photo vs. Actual Product
Most fast food items and many casual restaurant items look nothing like their photographs. Fast food, which the industry refers to as quick serve, is meant to be slopped together and served. The result is the slop you get pictured on the right. By comparison, a homemade sandwich below, made using food rings, looks more like the ideal sandwich.
Homemade Egg Muffin Sandwich


post credit: http://italianmeddiet.com/deceptive-food-photography/