Monday, March 30, 2015

Assignment: Surreal Photo Montage

Due: April 3rd 2015


Cassy Siena


HOW to COMPLETE PROJECT:


Shagufta Zareen
1. You will need to decide on a theme for your photomontage project. I would like you to write a paragraph based on a theme idea that you have. Some examples of themes could be a memory, dream, social issue, self portrait, and or traveling.

2.Describe the types of images that you are thinking of using and how you are going to manipulate them to support your theme. Bring in 3 original images, one scanned image and one image from a website.


This final project will require TWO posts. The first will be an explanation of your plan for the image.

(Example of POST #1)
Title: Surrealistic Theme For my surreal photomontage I would like to do a self portrait. I really liked the art and portraits of Oleg, the artist i did for my surreal artist. In order to meet the number of images i need in this project Im going to do the self portrait in a mirror, using one image of the back of my head and another of my face in a mirror. That's what i know of that part....as for the next part with the other pictures were I have two idea and Im not sure which I prefer yet.

1) The mirror will be partially cracked, each little section of the cracked mirror will have another image of something nice and warm and outside partially see through so that my image is still visible through it. The other side of the mirror will be fine, no cracks or anything. This will represent me in that the half that is intact will be reality, this is me now and what i look like. The cracked half is broken and shows where I want to be and I what I want but cant necessarily get or have so a 'broken' thought I guess.

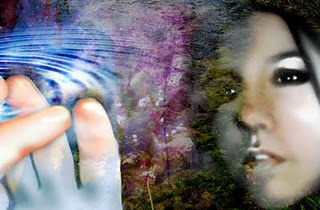
2) The same idea but this one the image of me and the mirror will have a hand up, one finger out touching. The part were the fingers are touching in the mirror will be rippled like water, distorting the reflection. I will use pictures of water and stuff to make the mirror look watery and reflective.


(Example of POST #2)
Title: "Mirror to the other Side"

And of course, as always, an artist statement. Use this area to explain describe, analyze and interpret your image in comparison with what you had planned, problems you ran into, etc. .
SAVE YOUR FINAL IMAGE IN MAJOR FOLDER AS
LAST_FIRST_SURREAL

Thursday, March 26, 2015

Photo Post Challenge: Recreate Childhood photographs


Similar to our challenge in which you had to post a photo of yourself reflected in another surface, you are to re-create a childhood photo. Take some time to look through old photos, and choose one you'd like to re-create. Try and use the same people, wear similar clothing, same style hair, revisit the same place, etc.  the more similar the better. If you do not have any old photos, you may use someone else's, but the more personal the photo is the more successful your final product will be. 

POST both the old and new photo by end of class Tuesday 3.31.15


Tuesday, March 24, 2015

Assignment: Surrealist Artist Inspirations


Surrealistic Artists Research: Due Friday March 27th 2015
Part #1-For your next project, surrealistic photomontage, you are going to need to choose 2 surrealistic artists to review. Write a brief biography (one paragraph minimum) on each of your artists. ONE must be a painter, sculptor, etc. and ONE must be a photographer, however, both need to be SURREALISTS.
Part #2 Describe their work by including the art critique method we used in class. Include the pictures of each of the art work that you choose.
Artist Review                                  
Artist’s Name  ___________________________________
Title of Artwork ______  Date of Work ______________
Description: The Facts Identify everything in the art work: (Objects, Lines, Shapes, Textures, Values)
Analysis:The Design Determine how the artwork is organized or composed. (Balance, Lights/Darks, Focal Point, Rhythm, use of Layers, Color enhancements, special effects)
Interpretation:The Meaning Explain what you think the artwork means or what the artist is trying to communicate:
Judgment:Make a personal decision about the artworks degree of success and an example of why you feel the way you do.
Part #3 -Compare and contrast each of the artists in terms of subject matter, techniques, style, or life background.

Please see Surrealistic Photo Montage Project in your MAJOR assignments folder, for an example of what this POST should look like when complete.

(Image Source: WALEE)
 

Friday, March 20, 2015

Photowalk II: Primary colors


Photowalking is the act of walking with a camera for the main purpose of taking pictures of things that the photographer may find interesting.
It is often a communal activity organised by camera clubs, online forums or commercial organizations, sometimes in the form of a walking tour. Often the aim is to practice and improve one's own photography skills rather than a specific focus on documentary photography.


While related to street photography, photowalking is differentiated by its impetus to photograph things of interest rather than people specifically. As with any walking that may go a few miles or kilometers, photowalking can also promote physical fitness.

The objective for this walk, IS TO SHOOT SOMETHING IN NATURE OR NEIGHBORHOOD because we will go out again and photograph this spot later in the year, upon the seasons change. You have to POST your favorite photograph from the walk when we return to class. You may edit in Photoshop if needed.


Be creative! Be interesting! Be funny! Be leading lines! Be rule of thirds!

Your assignment is to take a photo that represents the primary colors. You may do this with three different photos, or one photo containing all 3! 


YOUR  PHOTO FROM WALK MUST BE POSTED BEFORE MONDAY MORNING!

Friday, March 13, 2015

Photowalk Friday: I


For today's photo walk, you are to focus on DEPTH OF FIELD. Please review what depth of field is from your very first assignment PowerPoint, and see the images below. You'll most likely want to use your macro setting and get in close, but it is certainly not the only way. Spend today's walk looking around, see the world a little differently! You will POST your images when we return to class (can also be done from home this evening).


Thursday, March 12, 2015

Get better pictures with your iphone: use an APP!


Getting the most out the iphone camera

Rather than just whipping out the camera and slamming down the button, there are few quick tricks that can help you get better results, immediately.

The camera does not actually take the picture until you take your finger OFF the button. When you're preparing to take a picture press down the shutter button beforeyou line up the shot and then gently lift your finger it to activate the shutter.

This is a camera-shake reducer because it removes the impact of your finger pressing down onto the button and wiggling the screen. The volume + button on the side of the phone will also act as a shutter, as will the volume + button on your headphones. Those can be a big help if you struggle with shaky hands or if you're using a tripod and need a remote release (macro experimenters, headphone remote release is your new best friend).

how to use the iphone camera

The built-in camera will let you touch the screen to set where you want it to focus. You can touch somebody if you want to auto-focus on their face, or touch the closest thing on the screen to adjust the depth of field. It's a good start, but it's a little rough. There are apps that will let you take this control to the next level.

I shoot almost all my pictures with the camera+ app, first and foremost because it allows you to fine-tune the focus/exposure. Not only can you tap on the screen to set your focus (just like the standard camera) you can also use a second touch to set the exposure, letting you fully adjust the lights/darks in your image while preserving the focus. If you want to expose for the bright sky, you touch the lightest part of the screen; if you want to expose for the darker foreground you touch the darkest part.

changing the exposure on the iphone camera

Your Assignment:

1. Research camera phone applications. Choose one (one one per student so choose wisely and quickly)
2. Download app to your phone, WORK WITH IT, use it, snap photos, edit them, adjust them. compare them to photos taken with iphone camera and determine for yourself the pros and cons of each app. 
3. Create a blog post REPORT with images and examples of the things you cover in your report. 

REPORT MUST BE: 
-written in paragraph form (3-5 PARAGRAPHS)
-spell checked
-grammar checked
-include images
-include personal experience
-include PROS AND CONS


DUE THURSDAY March 19th 2015 


Wednesday, March 11, 2015

Assignment: David Hockney Inspired Collage

You will begin today by reading Project #2:  David Hockney Collage 
Between today and tomorrow, your assignment is to 
Objective: Create a TWO photos in the style of artist David Hockney (It is important to read the document above for the instructions) If you are not in school today, email me and I will attempt to explain in as much detail as possible.
You will need to bring in your photographs for this assignment Monday March 16th 2015


Hockney, Photo Montage
 
Here’s what you need to do…. 1. Watch the presentation on artist David Hockney, go on the Internet and find his work. Really get to know his work. How does he do it? What stories does he tell? What angles/perspectives does he use in his work? 

2. Decide what the subject matter of your collage will be. You will have to shoot 1 portrait (of anyone) and 1 your choice: Landscape, a certain room??? TOTAL: TWO PHOTOGRAPHS

3. Start shooting. Take LOTS of pictures! - these are digital photos so you've got nothing to lose, the more the better. Stand in the same place, get up close, back up, think about your angles, your perspectives. What story will you tell? 


4. The more images you have to work with for this collage the better off you will be. You will layer the images to create your collage.


5. Create your collage in Photoshop following the tutorial given in class. Create a large background canvas to work on. (directions to follow) 

6. Save your final collage with your name as the title in the folder labeled  MAJOR Assignments in our student assignment submit folder. Ex: Smith_Joe_HOCKNEY1

7. Don't forget to SAVE A SMALLER VERSION & POST your assignment onto your blog as well titled "David Hockney Inspired Collage". You need to also add an artist statement. *Step by step by step directions and assignment Rubric can be found in your ASSIGNMENTS folder


Cassandra Siena, 2011

Grading Criteria
_____ 10 Points Ready for Project on Monday 3.18.13: gathered images and uploaded to class computer.
_____ 10 Points Drawing in journal with labeled ideas
_____ 50 Points 1-13x19”, 300 Res ready print on due date
_____ 20 Points Aesthetic considerations

_____ 10 Points POST Project to Blog            
    Total: 100 Points

Summerlyn Astrom, 2011

Friday, March 6, 2015

Photo Post Challenge: Reflective Photography


                                                                  ©Matt 2011            
Weekend Project:
Using what you have learned about composition, lighting and backgrounds when shooting portraits, create a portrait that is a reflection of  someone.
Portrait Photography:  Reflection.
Create a reflection portrait: DUE Monday 3.9.15

1. The photo that you use for this assignment MUST be an original of yours, one that you took with a digital camera this semester.

2. Your image must be a portrait of a person, reflected in something.

3. Do NOT take a picture of you in a mirror, we have seen way too many of these already. Try for the most amazing, creative, compositionally dynamic image I have ever seen.

4. Upload your image in your drive or personal photos folder and on Monday
, and POST the image to your blog titled Self Reflection. We will VOTE on the most creative one! Prizes are involved.

Sunday, March 1, 2015

Assignment: Partner Project and Where I'd Rather BE

BOTH POSTS ARE DUE Friday, March 6th 2014

"Spit Ball"                        Arnold Guiteirez  2011
 Partner Portrait

Working with one-two partners, you will use 1 class block to photograph one another. You will each be responsible for submitting your own photo for a blog POST, these should be two very separate ideas, you are only working as partners to get your photo taken. If you would like to shoot outside school, you of course can do so on your own time.

 
"Bully"                              Luiz 2011

1. Plan image. Photograph according to plan.
2. EDIT image in Photoshop.
3. SAVE AS Last_First_PartnerPortrait in Major Photo Assignments Folder
4. POST, title post as PARTNER PORTRAITURE
5. Include in this post, a few sentences about your process.


2nd Post: 


Where I'd Rather Be
For this post, you will be manipulating multiple images to create a scene or place or situation where you’d rather be. You must use scanned or internet images (if they are good enough resolution) but the photo or yourself MUST BE RECENT AND TAKEN THIS SEMESTER BY YOU.

"I'd Rather Be in Boot Camp"                           Kuzma, 2011  
You may work with a partner during class to get the photographs taken.Remember! Using a solid background will make it easier to extract figures from the photo to insert into another. 

1. Plan image. Photograph according to plan, or use an image you have if it’s appropriate.
2. EDIT image in Photoshop.
3. SAVE AS Last_First_RatherBe in Photo Major Assignments Folder
4. POST, title post as I’d Rather Be
5. Include in this post, a few sentences about your process. 

THIS video should help if you are having trouble in Photoshop!  

"I'd Rather Be with Aston"        Astrom, 2011